Showing posts with label crafting. Show all posts

Tuesday, 4 June 2013

print + paint


A week long sabbatical from the internet reminded my creative juices that they are still present and correct despite being redundant for some time so I set them the task of finally doing something pretty with the beach stones and shells I squirrelled away from my Donegal trip.
I love the results, especially on the shells. They look really lovely occupying tabletops and windowsills.


I also spent some time customizing a sad little multi-frame that has been boring me to tears on my bedroom wall for some time!
A pair of scissors, some washi tape and an afternoon on my bedroom floor doing some cuttin' and pastin' the old fashioned way has revived this frame and made it something a little more unique and personal to me.


My Mom brought me back this Parrot's tail feather last week after a trip to the Gardening Centre where she rescued it from the floor.
It's so beautiful and the other side of it is canary yellow. 
Being in the country birdsong, nests in our roof and watching for different species at the birdfeed in our garden has become part and parcel of our daily living.
We're even lucky enough to spy beautiful pheasants running through the fields surrounding our house occasionally. 
I'll be sorry to swap the sparrows and the starlings for pigeons when I move back to London!


Monday, 18 March 2013

mail swaps


My love for all things sealed inside an envelope and found hidden inside letterboxes is no secret around these parts and today I wanted to give you a little peek inside one of my received envelopes ^^

I had the sweetest gift waiting for me in my mail box last week... a package swap from the beautiful Nicole from Gypsy in Jasper.

Nicole is from the Canadian Rockies and she put together the loveliest little treasures for me to discover in her package including stickers, cute woven bracelets, a scarf, wooden beads and this adorable crochet envelope that she hand-made herself.

Everything was so thoughtful and put together with love and attention, right down to the sweet message inside the card.

Thank you so much Nicole, I was delighted with every last thing and can't wait to send a treasure or two over to your part of the world!

If you are interested in taking part in snail mail or package swaps with me see this post for how to get in touch.

I love connecting with people the world over through this little internet pocket I have or through all things handwritten and lovely!

Also, why don't you pop over to Abhaya today where I am guest posting for Sondra while she gypsy steps her way around India (lucky thing). 

You can discover my second Korean love beside the paper goods...cute cosmetics!


Sunday, 17 February 2013

3 little things


One week, three tiny joys.


1. Free shoes!!


When Blowfish offered to send me a free pair of their new Spring season shoes to showcase on my blog I said "HELL YEAH!"
They arrived last week and they are beautiful.
Keep your eyes peeled for my first ever style post next week. 
 (not a direction I ever thought of taking on this blog but what girl can turn down a  free pair of shoes? 
"Not I", said the cat.)


2. Breakfast of champions


Lately this chilly season has me reaching for the kind of tasty comfort foods that are usually bad but oh... so good!
I've been treating myself these cold winter mornings to a breakfast of creamy chocolate milk and tuna and mayonnaise samgak kimbap, or triangle kimbap, which is basically rice wrapped in dried seaweed with a tuna and mayonnaise centre.
I know everything about this breakfast sounds wrong, but trust me, it's delicious!


3. Baby Wig Wams for my baby matryoshkas


I found the template for these adorable paper craft teepees on the same site I found the printable feathers for my cupid's arrow diy post.
Just so happens they are the perfect size to house my ceramic matryoshka beads.
Tiny joys, friends, tiny joys.

~.^ 


Wednesday, 13 February 2013

a sponsored post: DIY cupid's arrows


The happiest of Valentine's Days to all of you gorgeous people  
The old lady who lives inside me who loves to stitch and sew and make things with little glass beads rocked a little faster back n forth in her rocking chair when the lovely people at online craft supply store Wholeport offered to send me a parcel of goodies to craft with ^^

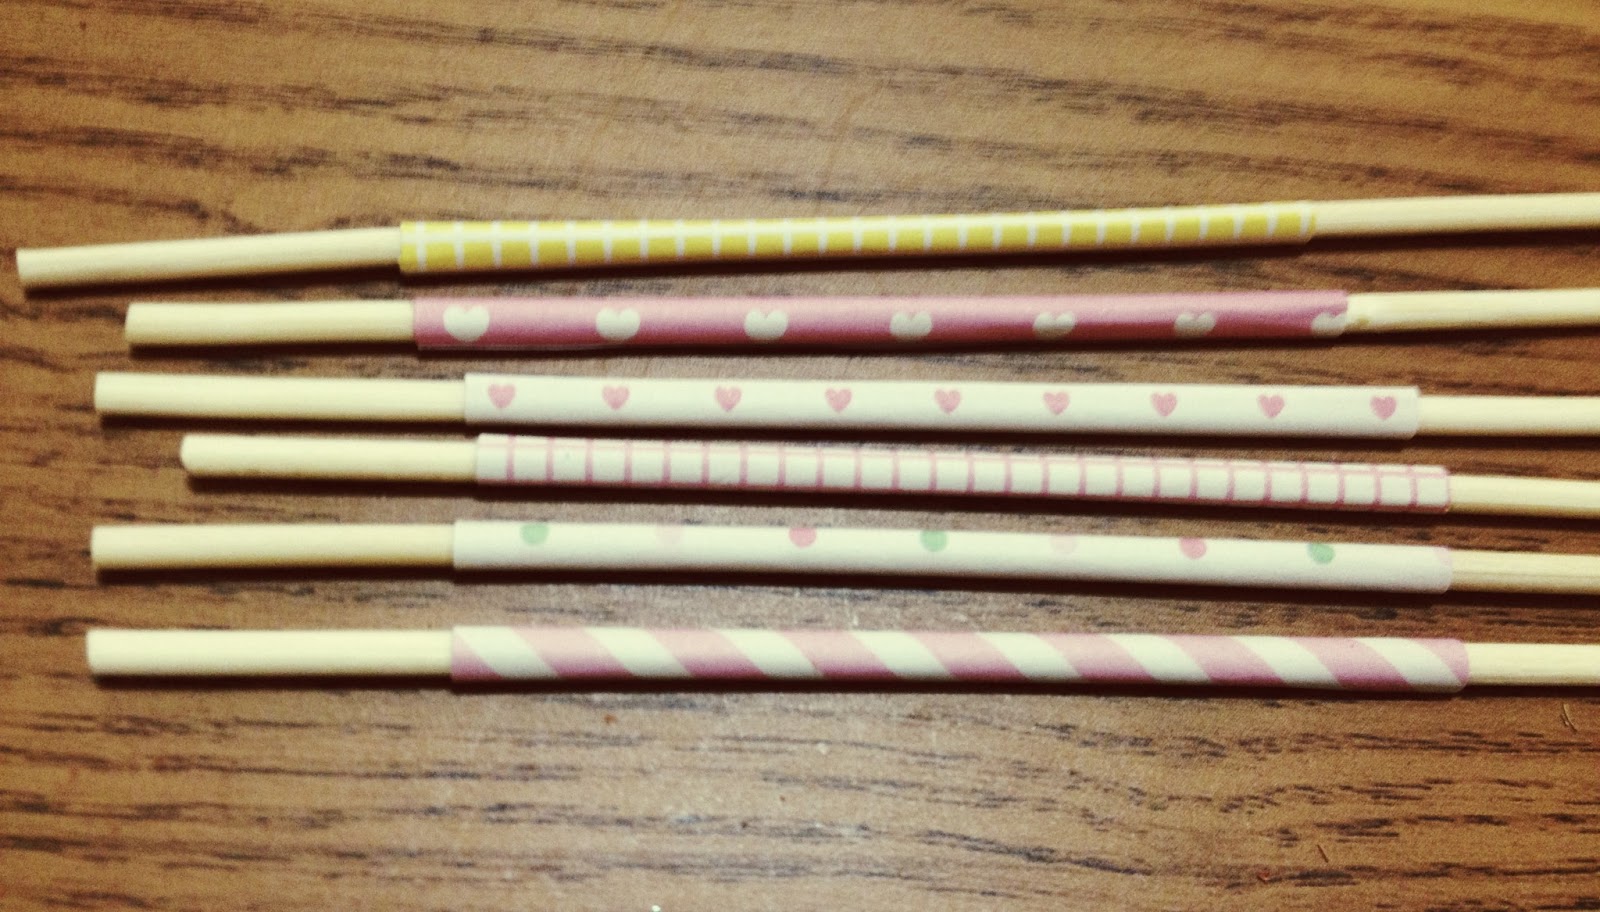
Among other pretty little doo-dads they sent me this lovely packet of masking stickers~ this is basically the sticker version of the Japanese washi tape that has been taking the crafting world by storm.


I've been wanting to use washi tape in a DIY post for a while now and the love-heart decoration on these gave me the inspiration to make these sweet-as-can-be Valentine's cupid arrows to give to your sweetheart on Valentine's day.


Behold the materials:
~ feathers (I searched high and low for craft feathers but they are apparently a rarity in Korea , so I made do with this feather printable)
~ washi tape/decorative sticker strips from Wholeport
~ bamboo sticks
~ craft wood chips (I sifted through untill I found some that resembled the shape of arrow heads)


Step 1:
Take a strip of decorative tape and carefully wrap it around one end of your bamboo stick. Repeat until you have an assortment of decorated sticks.


Step 2:
Gather together a sprig of  3 or 4 feathers.
Or in my case if you are using the feather printable, cut out a bunch of feathers.


Step 3:
Use invisible tape to attach your feathers to the decorated end of your bamboo stick.


Step 4:
Using a glue gun apply a small amount of hot glue to the bare end of your bamboo stick and attach your wood chip.


And you are DONE!
You can give your Valentine an arrow along with their card or, like me, use them as a wall decoration!
Lemon squeezy.


A special thank you to the wonderful folks at Wholeport craft suppliers for sponsoring this post. 
Check their site out for cute and extremely affordable crafting treats~ I have my eye on their beautiful selection of beads and feathers ^^


Saturday, 19 January 2013

DIY// craft paper envelopes


Raise your hand if you are a stationary fiend.
I'm more than a little obsessed with pretty paper goods and rarely leave a craft/stationary store without a bag of loot in tow.
I found this darling how-to on Pinterest on how to make your own envelopes using wallpaper samples.
I happen to have a box of craft papers which have been sitting on the shelf all sad and lonely since Christmas.
Now they have been transformed into these beautiful envelopes just singing for a handwritten letter to be slipped inside and mailed across the seven seas.
This tutorial is so quick and easy these things practically make themselves.
Ready? Let's go...


The supplies: 
~ craft paper/wrapping paper/wallpaper samples or any pretty patterned paper you have to hand
~an ordinary envelope
~scissors
~pencil


First, open out your envelope, lay it on the back side of your craft paper and use it as a template to trace around with a pencil.


Cut out your template shape with scissors to get an envelope shape.


Fold each corner at the edges.


Use glue to stick together the bottom and each of the two side flaps.


That's it! You are done!
See I told you it was super easy ^^


Decorate with pretty stamps and labels and fill with love notes and pen pal letters and poems and cards and anything else that people love getting in the mail!


Sunday, 30 December 2012

paper & woodland


Today was an early rise, pancakes for breakfast, back in bed till afternoon kind of a day.
I ventured out only once to make a run to the stationary store and discovered the world outside had turned into an ice rink overnight.
The freezing temperatures here have magicked the ground into glass while the glare of the low winter sun reflecting off the snow covered mountains created a supernaturally bright light.
Like a blinking little hedgehog I scurried back to the warmth of the apartment and spent my afternoon making these delightful paper craft house pets. 
They were one of my Christmas presents sent from a friend back home and I think they look just fine guarding our little floor garden. 
^^


Tonight Dallas and I are off for a mini date of Korean gamjatang and The Hobbit.
Enjoy your Sunday evening dears!

Wednesday, 19 December 2012

merry and bright


{{1//2//3//4}}


Gift wrapping is one of my favorite things to do. I love to gild the lily so to speak.
I think this goes way back in my memory to when my Mother would bring out her big box of endless papers and ribbons and bows and we would sit cross-legged on the living room floor each Christmas wrapping gifts surrounded by paper and scissors and odds and ends.
This year I don't have my Mom's big box of Christmas goodies so I've had to be more resourceful in my wrapping. I've been using brown paper, newspaper and old maps as wrapping paper and then tying the gifts up in twine. I love the clean and timeless look this gives them.
When it came to the gift tags I hopped online to see if there were any nice, free and printable Christmas tags available that I could download and use.
Turns out there is enough to fill Santa's sack.
Here is a round up of my favorite, beautifully illustrated, printable stickers and gifts tags by some very talented and artistic bloggers:


I hope you're all having a great week leading up to Christmas. Dallas and I are hosting another fancy pot luck dinner again this Saturday, this time for a Christmas dinner. We'll be giving Secret Santa gifts to each other so I've already been putting these lovely freebies to good use ^^

Happy gifting!

Sunday, 16 December 2012

monday morning ear candy


This weekend I took my cue from all the winter woodland hedgehogs, badgers and doormice and retreated snug and warm into my burrow apartment for almost the entire two days.
This morning I was forced out blinking and shivering for work again. How rude!
Although we do have a glorious work-free day on Wednesday to look forward to as it will be election day here in Korea.

I put the final touches to my parents Christmas presents ready to be shipped to Ireland today (don't worry  neither of them read my blog so I'm not ruining any surprises!)
I wrapped my Mom's present in brown paper and twine and used diy rubber stamps to print a Christmas tree design onto the paper~ a lovely and simple idea from Patchwork Cactus.

Aren't Dad's the peskiest people in the world to buy decent gifts for?
Last year I returned home for Christmas after four months of travelling and thrilled him with a traditional Native American headdress I bought for him in Thailand as he loves anything related to that subject.
This year I thought it would be nice to frame a photo we took of him wearing his gift last year and pegged them onto string along with other pictures of us and the family.


Here is a beautiful little collection of tunes Dallas put together last night just for you!
Please press play, relax and enjoy your day!
Thanks for visiting ^^


                                                        ear candy 7 by louloubelle on Grooveshark

Thursday, 13 December 2012

3 little things


One week. Three little joys.


1. Christmas crafting


These fingers of mine have been working double and triple shifts to get the tree, apartment decorations and what felt like a million handmade Christmas card, gifts and envelopes ready for posting.
The floor to our apartment has been a mess of thread spools and pine cones and little pieces of paper for weeks!
But finally, almost, kind of, I'm done! ^^
Some of those cards will have to cross thousands of miles to wish their merry Christmases to my loved ones.
One card in particular was addressed to a lady who I have never even met but I hope to share a little bit of Christmas peace and hope to.
Her address is:

Betty Vogel
425 E. Coleman Rd.
Clare, MI 48617

If you have a spare Christmas card left in your box I urge you to write a Christmas greeting and your signature and post it to this deserving lady and here's why.


2. Duvets & books


I have fallen shamefully behind in my reading due to a combination of Christmas prepping and and a very distracting new iPhone full of wondrous Apps for me to play with ^^
I have been making an extra special effort this week to snuggle under the duvet for 30 minutes every day after work and get back into my reading groove.

3. Lots and lots of hot chocolate


Because on these icy, frosty, cold-finger-and-toe mornings nothing else will do!
Especially when they come packaged so cutely ^^

What tiny joy kept you going this week?
xo

Tuesday, 11 December 2012

the crafty little christmas tree


I've been the busiest of bees the past week. 
I've been putting all sorts of grand Christmas schemes into action, making big messes in the apartment and starting new yule tide traditions with the beau.
This will be our third Christmas as a couple but our first living together and I'm not sure poor ol' Dallas knew what Christmas prepping does to this gal!

Happy for days.

I picked up this plastic tree for less than ten dollars and I knew I wanted to decorate my first ever Christmas tree using only found objects, nature and crafty odds and ends.
This is the result. Think Santa will approve?


 Mamma Gillanders would certainly approve of my decorating efforts~ she has filled my Christmases with colors and warmth and delicious smells since my memories began. 
Now here I am, arms wavering as I try to follow behind in her well-trodden footsteps.  I wonder what 10 year old Louise would think of grown-up Louise's first efforts at dinner and decorating? 


Sure there were bugs crawling out of the pine cones when I washed them before painting and the tree itself has a tendency to topple over if you so much as breath on it. But it's ours, and if a christmas tree's only job is to cheer up a room and give the 10 year old inside you a warm christmas-y, santa is coming kinda feeling when you look at it, well it's doing it's job just swell.

Happy Christmas!

Monday, 19 November 2012

in a pinch christmas card DIY


Last night was dedicated to all things christmas card making and I have the white scissor marks on my fingers and tiny scraps of colored paper over the floor to prove it!
It finally clicked in my brain that November is somehow inexplicably halfway over and the season to be jolly is almost upon us.

This quick and easy card and envelope DIY is perfect for those in a penny pinch (like me) who also want to create a more personalized card for their loved ones.

The supplies are minimial:
~ card stock
~ scissors
~ gold star stickers
~ decorative masking tape (you can also use ribbon or cut up bits of wrapping/magazine paper)


First step is to fold your card stock in half to make the card template.
Cut a trunk shape out of light brown paper and glue to the front of your card.


Start cutting and sticking your decorative tape in a diagonal shape and taper them upward to the top of  your tree trunk.
Sip on hot cocoa and marshmallows all the while to really set the tone ~.^
Finally, top your christmas tree with a festive gold star.


I also made little hand-sewn envelopes to place my cards in ^^
These are so simple to make~ Cut two equal sized squares of brown paper and stitch around three corners of them using brown thread, leaving the fourth corner open to create a pocket to slip your card inside.
Easy!


There you have it! Charming little homemade Christmas cards on the fly for a gal in a pinch.

Now, to the shopping!

Sunday, 4 November 2012

so it goes.


Yesterday was a seasonal flues blues, red nosed, mooch around in my pajamas all day kind of day. With a little rock n roll and needle n thread action for good balance.
It kicked off around 7.30am with breakfast and a side order of Velvet Underground.
I had to make a quick run to the doctor in Itaewon and scooped up some Campbells tomato soup from the international food mart on my way home to rustle up the perfect under the weather comfort food lunch: tomato soup with grilled cheese and avocado sandwiches.
I was feeling fancy so I threw some cinnamon in with soup and it tasted just like Fall in a bowl ^^


By 7pm I was still a mess of achoos and balled up tissues so I air kissed Dallas goodbye as he left for a night out with our friends and sat cross legged on the apartment floor for the next 5 hours finishing this canvas stitch project while watching Janis Joplin get high and jam with the Grateful Dead in Festival Express.

I'm tickled pink with how this turned out. Dallas and I scratched our head for hours over what quote we wanted to add-trading and dismissing lyrics, Wes Anderson and even Adventure Time quotes.
But then I remembered this quote from one of my favorite novels; Slaughterhouse-5 by Kurt Vonnegut and knew it was perfect: "So it goes".

I love how in three simple words it delivers such a powerful message of peace and acceptance with life. 

There's no real tutorial to go with this craft. All you need is a canvas, needle and thread and preferably the flu to give you Saturday night off and the long hours needed for it's completion!


Peace, love and all that good stuff.

x


Monday, 29 October 2012

Pocket Envelope Folder DIY

Morning campers,


Today's DIY was once more inspired by the Kawaii cute explosion that is Hello Sandwich, the Japanese based blog that was also responsible for this amazing string letter idea.

I am a self confessed ink and paper junkie and before I first departed for South K almost 3 years ago I asked a few of my closest friends to keep up our correspondence through snail mail. A tradition we have most valiantly stuck to and I cherish the mornings when my mailbox yields pretty envelopes with British stamps and postmarks on them. They're personal and romantic and something I can hold in my hand rather than keep saved in an inbox.

I also think it's a fun creative challenge to make something pretty my friends can pull out of the envelope and enjoy for longer than the time it takes to read an email and click close.

So, let's begin the crafty bit.
First, gather your supplies:


You will need:

1. A roll of card stock in your choice of color, I chose the traditional Manilla envelope color
2. Cute, bright colored envelopes in various sizes
3. Decorative string or twine
4. Vintage stamp stickers
5. Washi tape stickers


First, you will need to cut your card stock and measure off and fold your card stock to create the pocket envelope template.
My card stock was around 45cm in length, so I measured a short 5 cm fold (on the left)~ this would be  the lip of the envelope.
Next I measured 4 equal folds 10 cm apart. I had pre-measured my envelopes to make sure these folds were large enough to fit them.
When your folding, you should fold in a zig-zag type formation, like a map.


Next, grab your glue stick and attach your envelopes on to the folds in the card in any arrangement you want.


Decorate your pocket envelope folder with fun decorative tape, doodles, stickers and stamps.


Pop your cards, letters, trinkets, string letters or whatever you like into your pockets.


Fold up your pocket envelope and tie up with some decorative string or twine. 
You can embellish the outside with doily paper and vintage stamp stickers too if you like.

And your done~ just put this envelope in an envelope and give your friends something more beautiful and  exciting than a bill to look forward to from their post man's next visit.